S2 Life drawing

Principles of animation

Squash and stretch 

Squash and stretch is a technique that is used to give an object weight and flexibility. By playing with this principle in drawings you can give an object a different feel. For example, something like a falling rock would have very little squash and stretch. On the other hand if we had a rock made out of jelly, it have a considerably higher amount of stretch on the fall. Another important factor to consider when using squash and stretch is keeping the volume of the object the same for the majority of the time. Take into consideration that if the object is stretching, it’s width will get thinner etc.squash and stretch
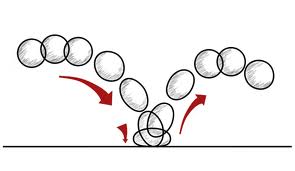
Link to photo: http://howtostartanimation.blogspot.co.uk/p/how-to-start-animation.html

Anticipation 

One of the most important things to remember when animating is making sure that the audience can follow what is happening on the screen. The technique used for this is anticipation. This is usually done by giving the character an action before the main movement. For example if a character is about to join, they will bend their knees before springing up!anticipationLink to image: https://xavecampbell.wordpress.com/year-2/unit-67-3d-animation/session-1-my-understanding-of-animation/

Slow in and slow out

A concept in animation that is crucial in timing. Timing is what can give your character the feeling of being a real thing. A good example is a character walking, while walking their legs and arms are moving the most. In the walk cycle the arms aren’t going to be moving at a constant speed back and forth, they will start slow and accelerate in the swing picking up speed only to slow down again before swinging back. The time of these movements is crucial for selling an animation to an audience.easy inLink to image: http://animation2012.weebly.com/slow-in–slow-out.html

Appeal 

Appeal is all about the personality of a character. It doesn’t matter is the character is good or evil, you want them to be likeable to the audience. I found that things such as symmetrical features or baby like facial features can help enhance the appeal. I will take this into consideration when designing my character.

Data & Visualisation, Face model, Head model

Head Model Reflection

This experience has really opened my mind on how things can be modelled using Maya. I’m used to creating man made objects so it was enlightening to try create something organic. I know software like Mudbox and Zbrush are out there but I was curious to try modelling a face only using Maya. Doing so I feel i have really begun to understand how Maya works and how important it is to use polygons. I plan to use my summer  to experiment with the other modelling software and see how it can improve my model quality now that I have a better understanding of Maya.

It sounds kind of crazy but I’m enjoying the puzzle of making a mesh using polygons. Before if I had a three pointed face, I would have lost my mind trying to fix it. Now I’m more confident looking at the problem and thinking of ways to fix it.

This task was challenging and in no way easy but now I feel confident that I have learn’t the grounds work for what it takes to make models for future animations.

Data & Visualisation, Face model, Head model

Head model

Before beginning my head model I asked the second years about good videos to watch for reference to help get started. One video that really helped me understand the stages of building a head was by James Taylor. He has a great tutorial video on how to scale your reference photos. This was crucial as once I import  into the scene, they are accurately scaleed to each other.

Link to tutorial used: https://www.youtube.com/watch?v=vhtI-vKx8YY&list=FLo8f4AI4CxqTW0VsgGOfbAw&index=12

following the tutorial I think I ended up with a good result!

Here is my final rotation of my head model.

face rotation


S2 Life drawing

Self Reflection: Semester 2

At the start of this semester I wasn’t too confident in my drawing skills, I felt like they had got worse over the course of our break. This made it rather frustrating at the start when going into classes knowing I wasn’t going to achieve what I was after but over time it started coming to me again. I felt like this semester of life drawing has broadened my mind when it comes to sketching characters. I have always found myself running into the trap of drawing in 2D but now, Im starting to see the shapes of the character in a 3D space.

For example I have always had a problem drawing hands and feet but I am now starting to feel more confident in my sketching technique. I really enjoyed the session when we focused on just hands as it felt like more of a challenge than usual lessons. I also found it interesting leaning about how to balance you characters, how one simple concept can give them weight.

Unfortunately I was not able to attend the last couple of lessons due to personal reasons back home and I feel like I missed out on crucial practices that would have really benefited me. This is disheartening for me as I was really starting to enjoy life drawing and I feel like I’ve let and others down. Though I missed classes, I feel proud of the work I have done over the course of my time but this does not mean I am satisfied with what I have learnt! It’s time for me to play catch up now that I have the time, I plan to dive into into the principles of animation and further my understanding of them.

Uncategorized

Kahiko

Kahiko.jpg

This little guy is called Kahiko, he spends his days wandering the island that he was magically brought to life on. The name Kahiko stands for “ancient hula dancer”

With this character I wanted to get his shape structure pretty straight forward with a pudgy body and square head.  This will allow me to exaggerate his body with squash and stretch in some interesting ways!

I kept the shape of the character very straight forward as I can express the most information with as little detail drawn but given the shape of Kahiko, I’m still able to add extra detail is needed.

Data & Visualisation, Narrative, Short Animation

Mother Bird Rig Ideas

So today I decided to try out different ways in how we could animate our mother bird. I found some nice tutorials on how to set up a face rig using controllers. Here I have a controller for the each eye and a main controller for the pair. This will allow us a lot of freedom for animating them.

I also made a controller for each of the eye lids and main one again. Having these eye lid controllers will prove useful for giving the bird expressions and allow for blinking. Again I did the same for the beak…

I’m confident with these face controllers we will be able to bring our mother bird to life and really sell her reactions to the eggs hatching

Once I had created the controllers I made a quick animation demostrating them in use.

So far I really like how the controllers are working so I added a rig from the base of the body to the head, this will allow us to give the bird head movement. Here is another quick test animating the rig with the face animations included.

The use of a simple rig will prove effective for what we are looking as our bird will be sitting down. Her main movements will be in the head so why make life more complicated…

Once I was happy with the controllers and the rig I decided to make a short animation of the mother bird sleeping. Our opening/first scene shows the mother bird snoring so doing this animation will give me a good idea of what our work load shall be for animating.

I can safely say that I am happy with the results for the rig. Of course our bird model still needs work but this has now put my mind to rest knowing that we will be able to animate it.

Data & Visualisation

Timing to the beat! Continued…

After successfully timing my first animation to a custom track I thought I’d give it a go again but with more shapes and movement. For this attempt I want to have multiple rendered scenes showing different shapes moving to different elements of the music.

Here is the first rendered scene completed. I plan to have the main beat represented by the puslating triangles in the middle and as instruments are added to the track, more shapes shall appear.

S2 Life drawing

Life Drawing: Handy work

This week we did a hand session, I found the class to be inspiring! I have always struggled in the past with drawing hands but Mike presented us with tips on how to get started.

I found that over the course of this session I started to get more comfortable with drawing hands. Previously I have falling into the trap of drawing hands in 2D but I have found it enlightening moving them into a 3D space.

hands page

Data & Visualisation, Narrative

Timing to the beat!

I love animation and the art of story telling but part of me has always been itching to learn how to produce a music video styled animation. I’ve always been fascinated about animation movements timed to the beat of sound. So I decided to dive into some sites that focus on the art of time animation to music.

Animator Island

On animator Island they talk about how to calculate your animation to a song. They suggest multiple ways to do it but the method I found most useful was the calculation that meets the two arts in the middle.

Using the equation 60s  x 24frames = 1440 frames a minute

So with this if we divide 1440 by the BPM (beats per minute) 1440/120 = 12

So this means to have an animation moving to the time of the beat I would have to have the movement hit every 12 frames.

With this knowledge alone I feel confident I could make a simple animation timed to the beat!

125bpm25fps.jpg

http://www.animatorisland.com/animating-to-music/

Here is a quick example I made on maya, I had the orb pulsating and lighting up to the sound of my track. The tips I’ve learnt have been very useful and I can’t wait to experiment more with this.